Adding a Custom Button to Entity Ribbon
In this tutorial, we will add a Custom Button called "My Custom Button" on Account entity, without using Ribbon Workbench, as shown in the figure below:

Figure 1
When the button is clicked, it will show an alert message.

Figure 2
Tools/Technologies used in this tutorial
- CRM 2016.
- CRM 2016 SDK, which can be downloaded from https://www.microsoft.com/en-us/download/details.aspx?id=50032.
- Internet Explorer 11.
- Visual Studio 2013.
The final customizations.xml file can be downloaded from here.
Let’s get started…
Creating a Solution
Go to Settings -> Solutions.
Figure 3
Click the "New" button.

Figure 4
Name the solution as "Account Custom Button". In the Publisher lookup field, select an existing publisher or create a new publisher. For more information about creating the publisher, see the "Publishers concept in Dynamics CRM" post.

Figure 5
Click the "Save" button and not "Save and Close" button, as highlighted in Figure 5 above.
Adding Solution Items
Click the Add Existing button and select Entity.
Double click the "Account" entity on the next screen.

Figure 7
Select the "Finish" button without selecting any other item in the window.

Figure 8
We also need to add a JavaScript file that will be used to call a function when our custom button is clicked. For that, create a new file and add the following code inside it.
function onMyCustomButtonClick() {
alert("My Custom Button Clicked!");
}
Save the file with any name. To add the file as a web resource in CRM, Select New -> Web Resource

Figure 9
Name the JS file as "MyCustomButton".

Figure 10
Click the "Save" button at the top. Once the file has been uploaded, close the window.
Exporting the Solution
Now we need to export the solution. Select the export solution button as shown in the image below.
Figure 11
On the next screen, click "Next" without selecting the "Publish All Customizations" button.

Figure 12
On the next screen, again select the "Next" button. In the end, select the "Export" button as highlighted below.

Figure 13
After few seconds, the browser will prompt to download a zip file generated by the CRM. Download that file using the Save As option.

Figure 14
After the file is downloaded, extract it and open the "customizations.xml" file in your favorite XML Editor. I am using Visual Studio 2013 as it also provides Schema Validation and Intellisense support. But if you do not want to use Visual Studio, it does not affect the remainder of this tutorial and you can skip the next section about adding Schema Validation and Intellisense Support to the customizations.xml file.
Adding Schema Validation and Intellisense support to the Customizations File
To add the Schema Validation and Intellisense support in Visual Studio, the CRM SDK is needed. I am using CRM 2016 SDK in this case that can be downloaded from https://www.microsoft.com/en-us/download/details.aspx?id=50032.
Figure 15
After the SDK is downloaded, extract it on the disk.
Now open the customizations.xml file from the CRM solution that you downloaded and extracted in the previous section.

Figure 16
Right click anywhere on the customizations.xml file and select Properties.

Figure 17
Select the button as highlighted below to select the schema file.

Figure 18
Select the "Add" button on the next screen.

Figure 19
Locate the path where you extracted the CRM SDK and select the "CustomizationsSolution.xsd" file from inside the "SDK\Schemas" folder.

Figure 20
Then select the "OK" button.

Figure 21
Adding Code in Customizations.xml file to create the Button
Replace the <CustomActions /> tag in the "customizations.xml" file with the following code:
Figure 22
<CustomActions>
<CustomAction Id="Mscrm.Form.account.MyCustomButton.CustomAction"
Location="Mscrm.Form.account.MainTab.Save.Controls._children">
<CommandUIDefinition>
<Button Id="Mscrm.Form.account.MyCustomButton.Button"
Command="Mscrm.Form.account.MyCustomButton.Command"
Sequence="46" Alt="My Custom Button" LabelText="My Custom Button"
Image32by32="" Image16by16=""
ToolTipTitle="My Custom Button"
ToolTipDescription="My Custom Button on Account Entity"
TemplateAlias="o1" ModernImage="My Custom Button" />
</CommandUIDefinition>
</CustomAction>
</CustomActions>
In the above code, the "Location" attribute in the "CustomAction" tag and "Sequence" attribute in the "Button" tag are important. To get the value for both attributes, take the following steps.
Finding the Location and Sequence Number of the new Custom button
Open the IE Developer Tool by using the "F12" Key. Then get the button Id from the "<li>" tag as highlighted below.
Figure 23
The Id we get is "Mscrm.Form.account.NewRecord". Now open the "accountRibbon.xml" from the "SDK\Resources\ExportedRibbonXml" folder.

Figure 24
Search for the Id "Mscrm.Form.account.NewRecord". You will find the sequence number, which in this case is 45.

Figure 25
As we want to place the button After the "New" button, as shown in the very first image in this article, our sequence number will be 46. We also need to note down the value of "Id" attribute of the "Controls" tag i.e. "Mscrm.Form.account.MainTab.Save.Controls", as highlighted in the figure above. This is the Parent Location under which the button will be placed.
The following image shows the detail about each item in the Button tag from the code we added above. For more information about the CustomActions XML, please visit https://msdn.microsoft.com/en-us/library/gg334536.aspx.

Figure 26
Adding the Click event on the Button
Replace the <CommandDefinitions /> tag in the same "customizations.xml" file with the following code:<CommandDefinitions>
<CommandDefinition Id="Mscrm.Form.account.MyCustomButton.Command">
<EnableRules />
<DisplayRules />
<Actions>
<JavaScriptFunction FunctionName="onMyCustomButtonClick"
Library="$webresource:my_MyCustomButton">
</JavaScriptFunction>
</Actions>
</CommandDefinition>
</CommandDefinitions>
The Following image shows the details about the above code.

Figure 27
Save your customizations.xml file.
Importing the Solution to add the Custom Button on the Account Entity
Select everything in the folder containing the customizations.xml file.
Figure 28
Right Click and select Send to -> Compressed (Zipped) folder to create a zip file. Rename the zip file to anything.

Figure 29
Next, click on the Import button to import the solution.

Figure 30
Select the zip file that you created above and select the "Next" button.

Figure 31
Click the "Import" button.

Figure 32
After the solution is imported, select the "Publish All Customizations" button.
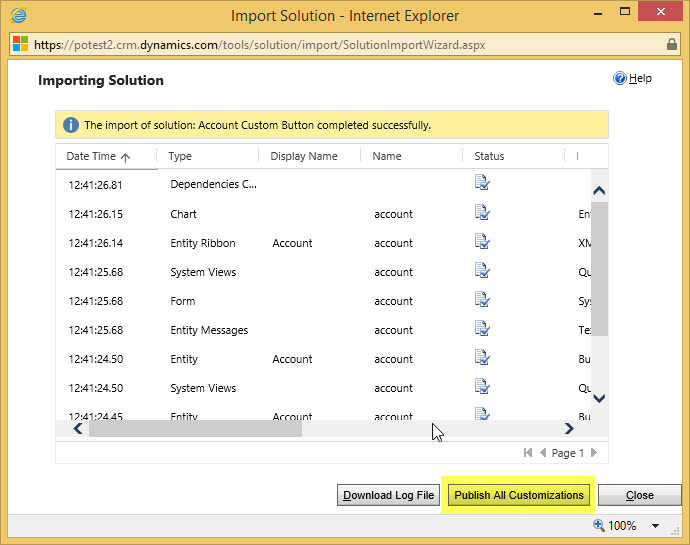
Figure 33
After the solution is published, click the "Close" button to close the window.
Viewing the new Custom Button
Open any account record or refresh the account record window if it is already open. The custom button should appear next to the "New" button. If it does not, press Ctrl + F5 to clear the cache and refresh the page.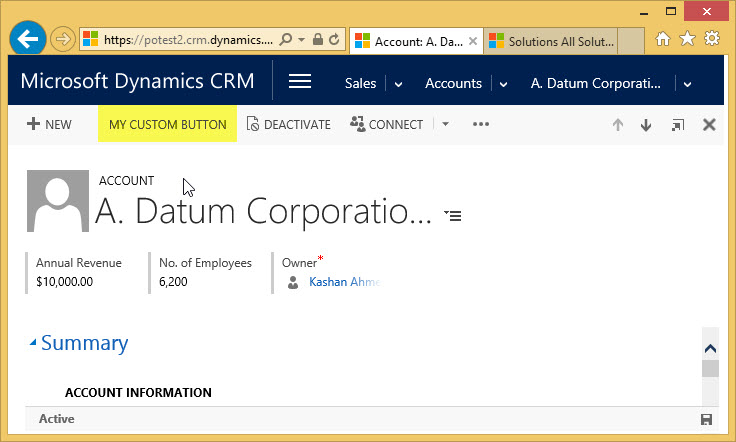
Figure 34
If you click "My Custom Button" (note that its title is automatically converted to CAPITAL letters), an alert message that we wrote in our JavaScript file will pop up.

Figure 35
This concludes the tutorial. Fee free to write comments, give suggestions and ask any question related to this tutorial.
Thanks Ahmed
ReplyDeleteIt's interesting that many of the bloggers to helped clarify a few things for me as well as giving.Most of ideas can be nice content.The people to give them a good shake to get your point and across the command.
ReplyDeletecrm solutions